Master Every Way to Take a Screenshot on MacBook (With Additional Tips)
Ever wanted to save exactly what’s on your MacBook’s screen? Well, you’re in luck! Learning how to take screenshots might just become your new favorite trick.
Think of screenshots as instant snapshots of whatever is happening on your screen. They’re super handy for showing something to a friend, keeping records, or even troubleshooting when you need help.
In this guide, we’ll explore the world of screenshots on your MacBook. By the end, you’ll know how to capture your entire screen, specific windows, and even just a part of your screen.

Different Types of Screenshots on MacBook
Okay, let’s start by talking about the different ways you can take pictures of your MacBook screen. Each of these types is useful in its own way. Let’s get into the details of how to do each of these.
Taking a Picture of Everything
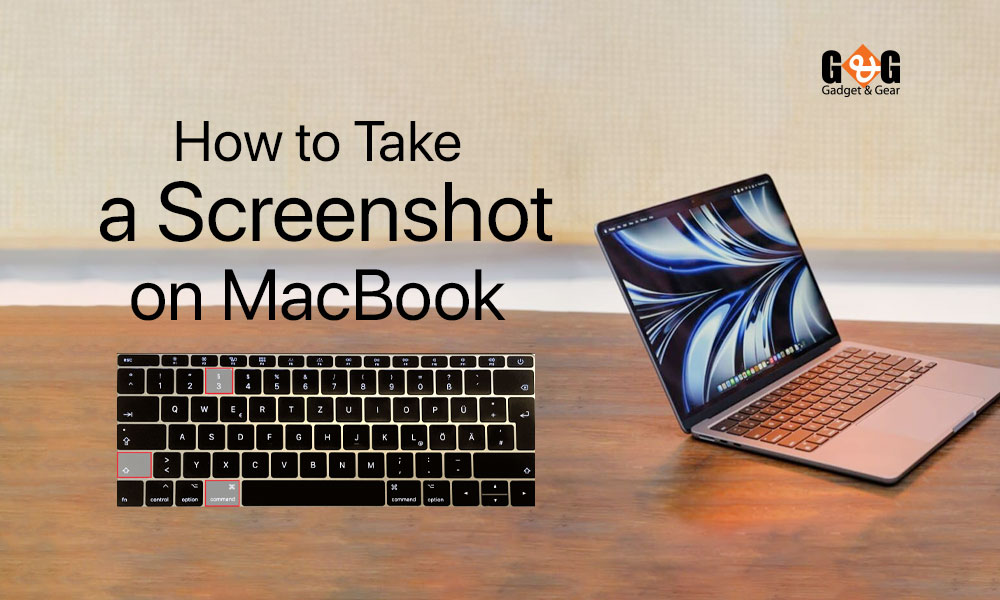
Imagine you want to capture everything on your screen, like a photo of the whole computer world you’re exploring. To do this, just press and hold three keys at once: the Shift key, the Command key (it’s got a funny sign on it), and the number 3 key. Boom! Your screen’s picture will be saved.
If you spot a tiny picture of what you just captured in the corner of your screen, you can click on it to make it even better or just wait for it to land on your desktop all by itself.
Picking a Part of Your Screen
Sometimes, you might only want to capture a specific part of your screen, like a cool picture or an important message. This is just as simple. Hold the Shift key, the Command key, and the number 4 key all together.
You’ll see a tiny crosshair when you do this. Drag it over to the area you want to capture. If you want to move your target around, press the Spacebar while you’re dragging. And hey, if you change your mind, just hit the Esc key.
When you’re ready to take the screenshot, let go of your mouse or trackpad button. Look out for the small picture in the corner – you can click it to make it even better or wait for it to pop up on your desktop.
Snapping a Window or Menu
Say you only want to capture a single window, like a picture frame on your screen. Or maybe you want a menu, like a special list that pops up. No problem! Hold down the Shift key, the Command key, the number 4 key, and the Space bar together.
You will see a camera icon appear on your mouse pointer. Click on the window or menu you want to capture. If there’s a shadow around the window that you don’t want, hold down the Option key while you click. And remember, if you change your mind, just press the Esc key.
Look for the little picture in the corner – click it to make it better, or wait for it to appear on your desktop.
Screenshots with a Timer
Imagine having a special tool just for screenshots. Well, in newer versions of macOS, like Mojave and beyond, you’ve got it! To open this cool tool, just press and hold the Shift key, the Command key, and the number 5 key together. It’s like unlocking a secret vault of screenshot options.
Inside this magical Screenshot app, you can set a timer. It’s like telling your MacBook, “Hey, take a screenshot in a few seconds!” This is handy when you need to capture something that changes quickly or when you want to prepare your screen first.
Finding Where Your Screenshots Go
When you take a screenshot, your MacBook saves it like a secret treasure. By default, it puts these treasures on your desktop. So, after you’ve taken a screenshot, just check out your desktop, and you’ll see the screenshot picture there. It’s usually named something like “Screen Shot [date] at [time].png.”
But wait, there’s more! If you’re using a newer version of your MacBook’s software, like macOS Mojave or a later one, you can actually change where these screenshot treasures go using the Screenshot App.
Not only that, you can even grab that little picture of your screenshot (the one that shows up in the corner of your screen) and drag it to a folder or a document.
Easily Share Screenshots Between Your Apple Devices
Your screenshots can go on a journey across your Apple gadgets – MacBook, iPhone, and iPad! This happens with a clever feature called cross-device integration.
Imagine you take a screenshot on your MacBook. With this magic, you can copy it, just like copying a piece of paper, and it goes into a special clipboard. Now, when you go to your iPhone or iPad, you can paste it from that clipboard. It’s like sharing a toy with friends!
This is great for teamwork. If you find a cool picture for a project on your MacBook, you can quickly show it to your friend on their iPad. No more typing or emailing – just copy and paste!
And what’s even cooler? You can start something on one gadget and continue it on another. Like reading a book on your iPad and then switching to your iPhone without losing your page. Your screenshots are there, ready to help you.
Final Thoughts
With the power of screenshots at your fingertips, you’re equipped to capture and share information effortlessly on your MacBook.
From basic screen captures to advanced techniques, this tutorial has covered it all. So, go ahead, explore, and make the most out of this versatile tool in your MacBook arsenal. Happy screenshotting!


